Quick n Dirty Animation.
Introduction

Despite being a bit of a technologist, I am, in some ways, a Luddite at heart. I learned animation on paper, with a 16mm Bolex to shoot with. Eventually I graduated up to the monster Oxberry animation stands before later starting to work with computer animation for remainder of my time in college and thence into professional life.
If you want further information about Quinda that’s not covered here, here are some other places to look, and possibly ask a question or two…
The Motivation
Computer animation is a lovely thing, but automatic tweening can be a crutch. I don’t want much in an animation program. An area to draw, frames to compare, and cycles. what I really want is something simple with which to play. I want a simple way to recreate the fun that I had when I took animation 1 in college. I think I have managed to get most of the different techniques from that semester crammed into one small package. I have added a few extra things to make it a bit more useful, and there’s room to add more features should anyone ask (nicely.)
The Basics
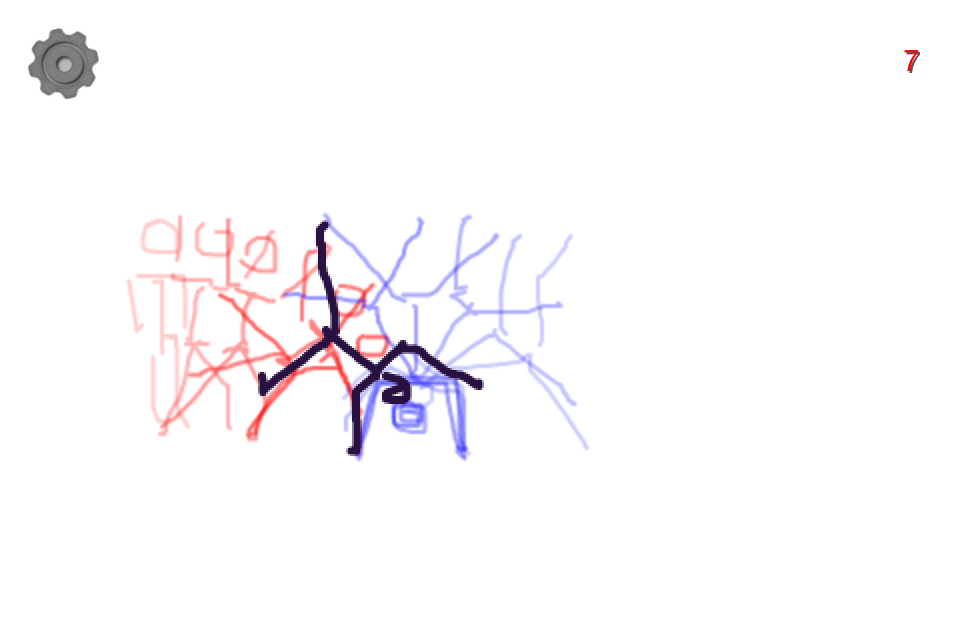 The basics are that you can simply draw frames right on the screen and advance to the next frame until you have an entire animation. by default, while you’re drawing, an onion skin is shown that references the previous and following 5 frames in highlighting colors, red for history, blue for future. Draw with one finger, swipe left and right with two fingers to change frames. You can do quite a lot without ever leaving this screen. swipe up with two fingers to delete the last stroke. (note that this is not an ‘undo’, it just delete’s the most recent stroke, so you can delete all the way back to an empty frame if you so choose.)
Eventually you’ll want to play the animation back. To get to the controls, you can touch the little gear in the upper left corner. (you can tap the screen with three fingers if you want to skip ahead to the playback mode…)
The Tool Screen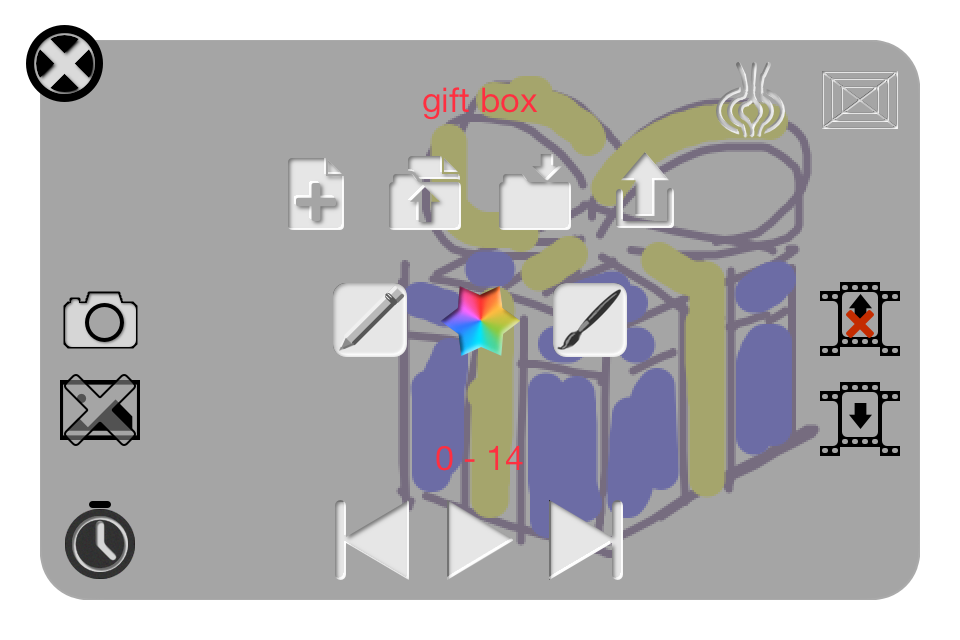
The control screen is broken up to several areas. of primary concern right now are the playback and timing controls at the bottom of the screen. They are basic controls, play, step forward, and step backwards. Also notice the little clock in the lower left. The step forward and step back buttons are pretty self explanatory except that the ‘step forward’ button will add new blank frames if you step beyond the end of the animation. The clock takes you to the playback screen where you get to make cycles, adjust the timing of individual frames, and playback the animation. The Play button actually does the same, but it also starts the playback right away.
Alignment
In order to help you draw where you want to draw, the main drawing screen has a couple of helpful options. A field guide, and Onion skinning. on the tool screen, these controls are to the upper right. A button that looks like a grid, and a button that looks like an onion. Onion skinning is on by default, but there are times when you may prefer not to see it.
Editing
over on the lower right of the tool screen are the frame edit tools. one will delete the current frame and the other will insert a blank frame at the current frame number, moving the subsequent frames one frame.
Art tools
There are three buttons in the middle that give you control over your drawing tool. The button right in the middle takes you to the color picker. Just to the right of that is the brush picker, and to the left is the pencil button which is just a preset to give you a thin grey line.
File tools
Just above the Art tools you control the file itself. From left to right,
- create a new animation, (closes the current animation and creates a new empty one.
- open another animation, (presents a list of all the animation you have made)
- rename your animation, (presents a way to type in a new name for your animation.)
- share your animation, (once you have created a Gif on the playback screen, this is where you would go to share it.)
Playback!
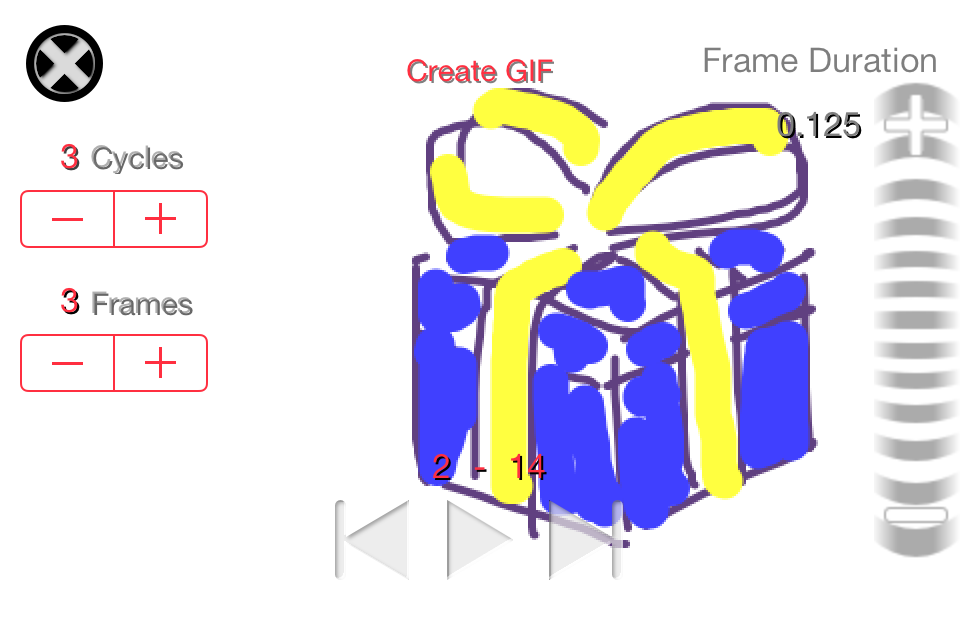 There are basically 2 different ways you can adjust the timing of your animation. You can hold on a single frame for a while, or you can cycle a set of frames for a certain number of repetitions. As such, there is a control on either side of the screen. On the left is the cycle controls, on the right, the frame hold time.
Starting with the hold control on the right, you may notice that the default frame rate is 8 frames a second, (equivalent to what’s known as “shooting in 3s” at 24 frames a second.) So, each frame is on screen for 1/8th of a second (or .125 seconds if you have a digital watch.) As you slide your finger up and down the control, you will see the ‘frame duration’ number go up and down. for very specific control, you tap the ends of the control, and the timer goes up or down by 1/16th of a second. (.0625sec)
On the left is the cycle control.
- A cycle is a series of frames that you repeat, either to show a repetitive motion, (like walking) or just to keep things looking alive while nothing else is happening. One of the features of hand drawn animation is that it can be difficult to be very precise with your drawings and as a result, lines move. If you just stop on a single frame, things can appear ‘dead’. instead, you might draw three or four nearly identical frames and repeat them. The object won’t move in the frame, but the lines will still be moving. It’s a technique to make things feel more alive. Alternatively, it might take 8 frames to animate a character taking a full walking stride. You can cycle those 8 frames to make the character walk for as long as you like.
The number labeling the control is the number of times that the cycle is repeated. A 0 indicates that the frames are simply played through. A setting of 1 repeats the cycle once, therefore each frame in the cycle gets played twice. As an example, if you set frame 5 to do a 3 frame cycle 3 times, the frame sequence goes like this: 0,1,2,3,4,5,3,4,5,3,4,5,3,4,5, 6,7,8,9. Note that the cycle count is the number of repeats, not the number of plays. Basically, cycling is like shouting “Encore!” If you add a cycle, a second control for the length of the cycle will appear. The default length of a cycle is 3 frames. Cycles are not recursive.
The whole screen is also a jog control. drag one finger left and right across the screen to scroll through the frames in either direction.
Lastly is the Create Gif button. touching this control will create an animated gif of the animation, which is saved in the application’s Documents folder. Your animation can then be shared from the Share button on the tool screen, or via iTunes sharing. (suggestions for more ways to share are welcome…)
To return to drawing, poke the X in the upper left or poke the screen with a two finger tap
The Camera Controls
Also on the tool screen, over on the left, are tools for adding (and subtracting) photos to frames. The camera shaped button opens the camera, and the picture with an ‘X’ on it removes the picture from the current animation frame. If you press the camera button, you’re taken to the camera view.
The camera has three options. You can take a single photo for the frame you are on, take a photo and automatically advance to the next frame, (ready to take another one,) or set it on automatic time-lapse. If you choose time-lapse, you are presented a control to set the time-lapse interval, counted in seconds.
When you have the right interval, press ‘Start’ and the camera will wait that many seconds and then fire and it will continue to do that until you hit stop.
As on the main drawing screen, there is a field guide to help with your alignment.
When you are done, poke the ‘x’ button to return to the drawing screen. (note that if you were shooting and advancing, or using time-lapse and went beyond the length of your animation, the frame you return to may be blank. if you don’t see a picture, it is probably because you are not on the frame you think you are…)
![]()
Pingback: Documentation | Things Made