Category Archives: Education

Dr. Waters’ Words to Live By

John Waters Commencement Address – RISD 2015 from RISD Media on Vimeo.

Just moments after he was miraculously dubbed “Dr. John Waters,” the wonderfully irreverent filmmaker and cultural critic gave one of the most inspiring and spot-on RISD Commencement addresses in recent memory. Waters accepted an honorary degree from RISD – his first degree of any sort from anywhere – “without irony,” as he put it.  At the podium the maker of Pink Flamingos, Hairspray and many other over-the-top films appeared to be totally in his element as he told the crowd that he’s surely qualified to be RISD’s Commencement speaker, especially given a short list of non-accomplishments and misdemeanors – and his early aspiration “to be one of the filthiest people alive.” “I’ve been called ‘The Prince of Puke’ by the press,” Waters smiled, “and most recently, a title I’m proud of: ‘The People’s Pervert.’ I am honored to be here today with my people.”  In a bouncy speech (hear the full thing above) that kept the crowd of 3,500 graduates, families and guests laughing so hard that he had to pause from time to time to be heard, Waters pointed out that as unlikely as it might sound that RISD would offer him an honorary degree, “I didn’t change; society did.”  Mostly he focused his attention on RISD’s 667 graduates, urging them not to hoard their talents. “Remember, you must participate in the creative world you want to become part of…. Keep up with what’s causing chaos in your own field…. Read, read, read. Spy, be nosy, eavesdrop!”  Waters also reminded graduates that they shouldn’t hate all rich people, especially since someone needs to help fund their creative endeavors. “I’m rich,” he said, because “I have figured out how to never be around assholes at any time in my personal and professional life. That’s rich.”  While targeted at RISD students in particular, Waters’ words seemed to resonate with the majority of the crowd packed into the RI Convention Center hall. “Go out into the world and fuck it up beautifully!” he urged.

Source: Our RISD — Dr. Waters’ Words to Live By

custom transitions

here’s the basic recipe for doing custom transition animations. (this does not include use of newer transition coordinator, just simple transitions.)

within a UIStoryboardSegue object, you are handed the two view controllers at either end of the segue.  So:

  1. you take a snapshot of your sourceViewController view, which is a UIView.
  2. add that snapshot as a subview of the destination view controller, (you may have to correct for the presence of navigation bars etc.)
  3. Push (or pop, if you’re unwinding,) the destination view.
  4. animate the snapshot where ever you like to get rid of it.
  5. then remove the snapshot from the destinationViewController view.

basically, it’s a magic trick. you’re swapping out one view controller for another that has been temporarily masked to look like the first one. and then you throw away the mask with a dramatic flourish. If you’re a fan of magic, a reasonable metaphor might be “The Pendragons” and their most famous trick.

in code, your custom UIStoryboardSegue code might look like:

-(void)perform
{
        UIView *source = [(UIViewController *)self.sourceViewController view];
        UIView *snap = [source snapshotViewAfterScreenUpdates:YES];
        [[self.destinationViewController view] addSubview:snap];
        [[self.sourceViewController navigationController] pushViewController:self.destinationViewController animated:NO];
        [UIView animateWithDuration:.5
                         animations:^{
                             //do fun animation with snap here...
                         }
                         completion:^(BOOL finished) {
                             //if you want to, you can put another UIView animate with duration here for multipart animations
                             [snap removeFromSuperview];
                         }];
}

important thing to note is the cast to (UIViewController *). Since most view controllers are custom objects, the initialization for UIStoryboardSegue defines the two as id to allow for this, so before you can send it messages, you have to tell the compiler what messages it can receive.  Alternatively, you could cast it to a id with a protocol, but you would have to make sure that you also defined any other methods that you might want to use in the protocol.  you might find it worth while to rewrite the init method of your custom segue to require a particular protocol and type as well.

UITableViews

initially the mechanics of these were a bit of a mystery. API documentation leaves a lot to be desired…

The bird’s eye view of the process of working with a dynamic table goes something like this:

creating the table:

when ‘reloadData’ is called:

  1. the table delegate/datasource is asked “How many sections do you have?” and the data source must answer with a positive number.
  2. the table delegate/datasource is then asked by each section, “I’m in section x, how many cells should I have?”
  3. the table delegate/datasource is then asked by each individual cell, in order, “I’m cell  y from section x, what data should I have?”

and lo, all the cells are filled. at this point there is a one to one association between the data source and the visible table. from this point on, if this ever disagrees, the app will probably crash. these three questions come in the form of these three objective-c calls

  1. - (NSInteger)numberOfSectionsInTableView:(UITableView *)tableView
  2. - (NSInteger)tableView:(UITableView *)tableView numberOfRowsInSection:(NSInteger)section
  3. - (UITableViewCell *)tableView:(UITableView *)tableView cellForRowAtIndexPath:(NSIndexPath *)indexPath

number three there comes with some boilerplate code when it is generated by Xcode, which is designed to manage only maintaining a relatively small subset of all possible cells. The intent is that a cell is memory intensive, and if you have a long list, most of which is off screen, you shouldn’t waste memory on stuff you can’t see. so the lines:
static NSString *CellIdentifier = @"simpleCell";
UITableViewCell *cell = [tableView dequeueReusableCellWithIdentifier:CellIdentifier forIndexPath:indexPath];

are there to provide you with just the cells you need to fill at any given moment.
(an index path is a structure that is made up of two members, an array of integers that is the path, and a separate integer that is the length of the first array.  technically, indexPaths can be of any length, but in iOS, they are always of length 2. the first number is the section, and the second is the row in that section.)

editing the table:

this was the tricky bit. just because the table loads from the data source, and provides all the funky animated editing modes doesn’t mean that you don’t have to keep the data source synchronized manually.

the basic things that you can do when editing a table structure are:

  1. delete an item
  2. add an item
  3. move an item from one place to another

though it turns out this last thing is just a combination of the previous two.

again, when you do these things, several calls are made to the datasource from the table view to establish a) am I allowed to do this, and if so, b) what are you going to do about it? and it asks slightly different questions for 1 and 2 than it does for 3.

the first thing you have to do to edit the table is enter editing mode. this can be done programmatically, by calling  [self.tableView setEditing:NO animated:YES];
though happily a table view has an inherent ‘edit’ button you can activate by simply calling self.navigationItem.rightBarButtonItem = self.editButtonItem; during viewDidLoad somewhere.

once you do this, unless you’ve changed something, the table will now show an accessory in each cell to the right or left of the content.  to the left, assuming it’s a allowed will either be a green circle with a plus sign or a red circle with a minus sign to add or delete that row. and on the right side, if it’s allowed will be an icon of three horizontal bars that is presumably supposed to be a gripper (or some other iconic indication that you can reposition the cell.) which symbol goes where is controlled by the tableView asking it’s delegate the same questions, once each per cell. and they are:

  • - (BOOL)tableView:(UITableView *)tableView canEditRowAtIndexPath:(NSIndexPath *)indexPath
  • - (UITableViewCellEditingStyle)tableView:(UITableView *)tableView editingStyleForRowAtIndexPath:(NSIndexPath *)indexPath
  • - (BOOL)tableView:(UITableView *)tableView canMoveRowAtIndexPath:(NSIndexPath *)indexPath

the first, obviously, can I edit this row? which dictates whether you get the edit control on the left at all.  The second, which dictates which control it is. the first and third are, in fact, optional in that if the table view gets no answer, it assumes yes.  you only have to specifically say no. for the second one, if there is no answer, the assumed edit type is ‘delete’ .  To repeat, these are optional. you don’t have to implement them if you don’t want to do anything complicated.

However. assuming you have enabled editing at all, once you have performed an edit, the table view will inform its delegate of this and you should then do something about it. these are the methods that it calls to do so.

  • - (void)tableView:(UITableView *)tableView commitEditingStyle:(UITableViewCellEditingStyle)editingStyle forRowAtIndexPath:(NSIndexPath *)indexPath
  • - (void)tableView:(UITableView *)tableView moveRowAtIndexPath:(NSIndexPath *)fromIndexPath toIndexPath:(NSIndexPath *)toIndexPath

The first says to execute the edit based on the style that we optionally set earlier, and the second is simply to move from one place to another. inside these implementations is where you are supposed to actually do the work to keep the view and the model synchronized.

for example, to delete a row from the array and the table view (note that the methods are plural! the first argument is an array.):
[self.listThings removeObjectAtIndex:[indexPath row]];
[tableView deleteRowsAtIndexPaths:@[indexPath] withRowAnimation:UITableViewRowAnimationFade];

and to move a row:
id thingy = [self.listThings  objectAtIndex:[fromIndexPath row]];
[self.listThings removeObjectAtIndex:[fromIndexPath row]];
[self.listThings insertObject:thingy atIndex:[toIndexPath row]];

interesting to note that with deleting (and adding) rows, you have to manually remove them from both the tableview and the model. where when you move a row, the table view is taken care of visually and you only have to alter the model to match. (well, you don’t have to, but it seems like a good idea.)

other than custom cells, this pretty much covers every basic thing you need to know to get table views working.

good luck. let me know if I’ve left anything out.

James May’s Man Lab

I’ve recently become enamored of James May’s Man Lab. Well worth the viewing, even if you fast forward over some of the more sociological (and cringeworthy) bits of the show. the actual making of things is great.

and somehow it doesn’t come off as patronizing… why oh why is there not this kind of programming on this side of the pond… or for that matter why oh why will the bbc not let me pay a license fee for the iplayer out here in the pacific northwest?

making charcoal

well, char… or bio-char as it is now popularly known.

fairly simple process as it turns out. what you basically need to do is to have a nearly sealed fireproof container that contains the wood you want to convert to charcoal and you need a heat source to cook it. handily one of the by products of cooking wood is a bunch of flammable gasses, and the quicker amongst you can probably already see where this is going.  the trick is to direct the gasses into the flames that are heating the soon-to-be-charcoal. the simplest  way that I’ve found so far is described at the New England Biochar website.

it breaks down to the following steps.

  1. fill a small metal bucket with the wood you wish to convert.
  2. invert small bucket inside slightly wider and taller second metal bucket that has a line of airholes punched into the bottom edges.
  3. surround the inner bucket with kindling. the trick here is to figure out just how much. too much and there is lots of smoke. too little and the inner bucket wont get hot enough.
  4. light several parts of the kindling so that the fire will burn relatively evenly.
  5. adding a lid with a chimney will make the whole process more efficient.
just after ignition

just after ignition

basically what happens is that the outer layer of fire heats the inner bucket. inside the inner bucket the wood cooks, releasing quite a large amount of flammable gas, this gas seeps out the inner bucket, and is ignited by the already burning wood to further heat the now toasty warm wood.  eventually, the fire burns itself out.  it’s very important to wait until the inner bucket cools down before opening it. the smoldering wood might suddenly catch fire.  that’s what I’m waiting for now.  more news later…

simple puff pastry

if you don’t have the time-life series of cookbooks, this episode of Baking with Julia is a good primer for puff pastry, (the kind without yeast… we’re not talking about croissants here.)

the basics are this, 4 parts flour, to slightly more than one part water. pastry flour for preference, though cutting your all-purpose with cake flour works out the same. (3 parts all-purpose to 1 part cake is a good ratio) gluten is not really your friend here, so I suspect this would work well with gluten free flours. I did an experiment recently attempting gluten-free croissants, it wasn’t entirely successful, but it was better than might have been expected…

blend the flour and water (and a teaspoon of salt) very thoroughly. (this is a good time to use a cuisinart or equivalent.) make it into a ball, wrap it under a damp towel in the fridge and let it rest for a while. say 1/2 hour…

take roughly the same amount (by weight) of cold butter as the flour. pound it flat. this is a key point, softening the butter by pounding ‘fractures’ the butter and makes it workable without letting it melt. if the butter warms, you’re screwed.

roll out the dough big enough to lay the butter on top of and wrap the butter in the dough. roll it out, trying to keep it in a pretty neat rectangle. then fold it in thirds. wrap it in plastic wrap and put it in the fridge for 1/2 an hour.

this process of rolling out and folding in thirds needs to be done 6 times in total. and it needs to be kept cold so the butter doesn’t melt. usually you can get a couple of turns in before rechilling, but when in doubt, chill it for a while.

lastly, when the last turn has been done and the dough is chilled, roll it out and make the pastry you want to make. if you’re making palmiere or similar, you’ll want to chill the pastries one last time before baking. you can even stick them in the freezer for 10 minutes.

bake at 400F for 6 minutes or so for cookie sized pastry. turnovers and the like need 450F for 17+ minutes

drawing notes in garageband

one of the things that has been frustrating me about garageband for weeks now is the inability to change the duration of the ‘drawn’ notes in the piano roll.

this is now solved! oy…

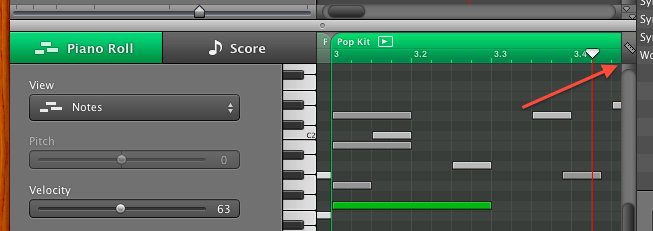
all of the documentation I found will tell you that the track editor grid menu in the upper right of the track view (see below) is the place to change the duration of drawn (i.e. command clicked) new notes.

track editor

this is false. in order to change note duration of newly drawn notes, you have to select the score view.

piano roll view

and change it with the insert menu there. this change will carry over to the piano roll when you switch back. for some reason, the piano roll does not show the insert menu… go figure.

happy composing!