Author Archives: psgouros

not quite…

but almost. it turns out that brazing bronze needs *juuuuuust* a scoshe more heat than an electric stove can supply. even the propane torch helping along couldn’t quite do it. have to invest in the acetylene after all I guess…


more news as events warrant.

Three day workbench

thought that it might be worth a try to construct a more traditional workbench, just to see if any of the multitude of words spilled on the subject were actually worth anything.

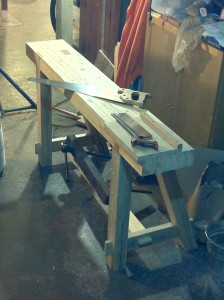
starting from an episode of the woodwright’s shop and a large shipping crate that had served it’s purpose, I resolved to build a simple french style workbench. I used this particular size of bench as it was designed to be relatively narrow. and I only had 8 or so 2x4s to work with. much has been said about what wood you should use for the top of a workbench. I prefer what I have available…

the vice may yet get installed, it was rescued from a built-in that needs to be burned...

the first step was to laminate the top.  since I was going to be flattening the top facing surface when I was done anyway, but I wanted the underside joinery to be regular, I clamped the 7 2x4s together with the uglier sides facing the table top. this meant that the bottom of the table would be pretty flat without having to do any work on it. I planed the mating faces lightly for a good glue surface and laid it up.

second step was to figure out the legs.  the only addition I made to Underhill’s original was to add a ‘trestle’ stretcher between the legs, rather than a tool box.  though you never know, I might add one later…  for the technically curious who might wonder what angle the back leg is at, it’s at whatever angle it takes to get the leg to stay under a 9″-11″ wide tool tray that has as yet not been added. (if you really must know, it’s in the vicinity of 70º.) the bigger question should be “how tall is it?” and “does it make a difference?” Answers: “just shy of grazing my knuckles when standing relaxed with my arms by my side,” and, “Hell yes.” proper table height for a particular task is a worthing thing to spend some time figuring out. your back will thank you… quickly…

Tired Feet

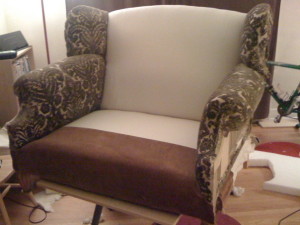
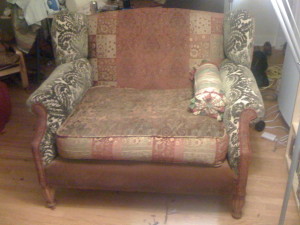
A little while ago, I posted a bit about a chair I built. One thing that was lacking about that chair was an ottoman. I actually built the frame of it a long time ago, and was convinced to let someone else finish it. now 2 or 3 years later, I got tired of waiting.

I finally finished turning and carving the legs, I finally decided that given the patchwork nature of the original upholstery job, it would be kind of fun to mismatch the legs.
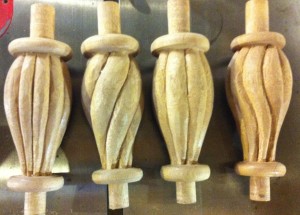
Ottoman Legs

On top, I decided that I would upholster this in a slightly less sprung way than the chair. The chair has a sprung deck, on top of which sits a sprung cushion, (see below.)

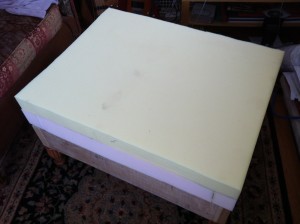
The hassock, by contrast, is getting a marshall unit, (pre-wrapped spring set,) spring hassockdirectly onto the webbing, then surrounded by felt, foam and cotton batting.
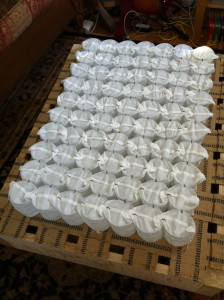
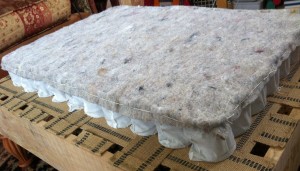
Felted Spring foamed hassockso far I’m up to the foam rubber. the next step is going to be to make a light weight calico bag for the cushion top that will encase the foam and a couple of layers of cotton batting so that I don’t have to worry about abrading the foam or messing anything up with the outer fabrics.

btw, here’s a basic rule of thumb about upholstery. it basically breaks down into a few simple steps. start with an uncomfortable frame. then add progressively less uncomfortable layers of padding wrapped in progressively finer fabrics until you’re done.  so long as every layer is pretty secure before you go on to the next layer, the rules are pretty loose… sounds tongue-in-cheek, but it’s pretty much how it’s done. For example:

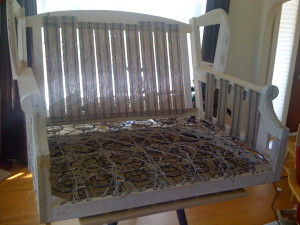
first the frame:
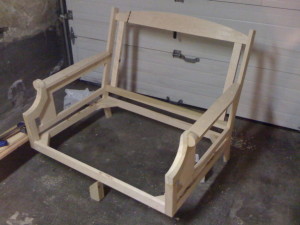
for future reference, use thicker beams around the spring box at the bottom. the webbing tension is considerable.

then webbing and springs:

framed and webbed

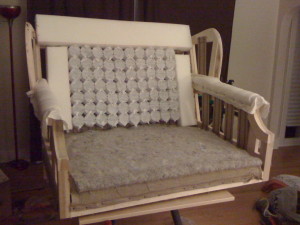
then burlap/felt:

burlap and felt layers

then nice cloth:

cleaned up deck

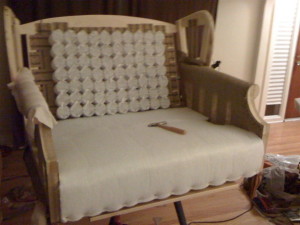
then nicer cloth:

finished deck


n.b. for the foam rubber, around seattle you can go to pacific fabrics or joann’s, but I heartily recommend going to friendly foam over on Roosevelt in the U district. I’ve bought from them under both the old and new management, and the new owners remain quite friendly and knowledgeable. (and substantially neater…)  they also have a much wider selection of foam types to choose from.

things to do with flour

I find it interesting to look at baking recipes and deconstruct them. During the times when I found myself with the least funds, I made it a bit of a mission to figure out just how far I could go with a bag of flour. it turns out you can go a surprisingly long way…

flour and water
pasta. very simple, make a pile of flour, dig a well into the middle of the pile, add water and begin to stir with a fork. as you stir, flour will begin to be picked up by the water, and as you continue, the mixture will become firmer and firmer until you have a dough. remove the dough from the rest of the flour and knead it a bit until velvety, then wrap it up and rest it for a while. when it’s settled, roll it out and cut it into noodles. cook in boiling water for a couple minutes and voilá, dinner. additionally, if you use more water and end up with a kind of soup, just leave it alone, somewhere warm, for a few days and it will start to bubble. add a bit more flour to thicken it up a bit and let it bubble for a while longer then bake. tada! you’ve made sourdough bread. yeast doesn’t have to come from a jar of packet.
flour, butter, and water
pie crust. simple concept, possibly difficult execution. use a couple of knives or a pastry cutter to cut the butter into the flour. when the butter is all granular, (no piece bigger than a small pea,) add just enough water to get the powder to hold together. the objective here is to add the water and mix it in without causing the flour to develop any gluten it might have. gluten free flours actually win out here… food processors are good for this, but they tend to cut the butter too finely for my tastes. Also puff pastry. actually, between pie crust and what’s generally called mille feuille (thousand leaves) there seem to be an infinite number of variations that all end up doing roughly the same thing. which is to use butter as a way of separating thin layers of flour from each other. I did a more detailed look at puff pastry a couple of months ago.

coming soon, we’ll add an egg…

full of brims

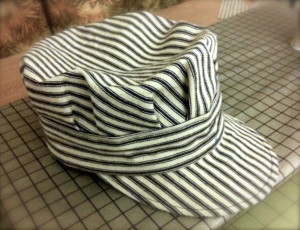
how does one put a brim on a cap.

engineer hat

engineer hat


the basic idea is that of constructing a cone.  but the simple answer is to construct it mostly like a collar. trace the curve on the flat and then extend or shorten the outer edge by cutting and spreading.

one tool that I’ve found invaluable for making hats is a profile copier, (or ‘contour gauge’ if you want to google it.)  if you get the lightweight plastic variety, they don’t hurt as much as you press them against your head. (the wire ones can be a bit ‘sharp’…)

anyway, once you get a perfect profile of your head at the level you wish your hat to sit, you can trace it out onto cardboard and cut it out. providing the cutout fits your head perfectly, you’re golden. if not, adjust until perfect.  then gild that template, you can use it for everything. secondarily, measure over the top of your head from front to back and side to side. notate the measurements on the gilded cutout disk that you now have for your head pattern and you pretty much have everything that you need for making pieced hats in the future.  (by pieced, that is stitched material, leather, twill etc., rather than shaped felt…)

anyway, if you trace that profile onto a material and cut it out, you will end up with a hat with a flat brim. most hats have a bit of an arced brim. the arc is defined by whether the hole is made narrower (left to right) or shorter (front to back) than the original hole. classically, if you are looking at things like western hats, you have those two choices. if you want the front of the hat to come down to a point in front of your face, you make the hat a little wider but shorter than the head profile. that way you have to pull the front and back of the hat out to fit the head. causes the front and back to dip and the sides to rise. but the folds tend towards the front and back. if the hat is constructed to be longer but narrower. causing the fold of the front brim to fold down crosswise across the eyes. the former is far more common than the latter.  best to work out the curve you want with some thick paper or thin cardboard before you commit to actual hat samples.

so, in this case, the brim is made a bit wider but shorter.

another way to think about it is that for a flat brim, you use the precise head profile, and for a vertical brim you use a straight line for the back edge of the brim.  what you probably want is somewhere in between. actually you can probably mix and match a bit.  this might require some experimentation…  I may have to get back to you on that.  diagrams to follow at a later date…

decided to see if the forecasts for the comet and weather were accurate…

sunset at ocean shores


the weather report was, but regrettably the comet was not forthcoming… better luck in the fall I guess.  It was a beautiful (if chilly) day at the beach though…


drawing straight lines…

a friend of mine growing up used to quote her art teacher’s heavily nasal intonation: “an artist does not use a ruler!” 

but drawing straight lines freehand is tricky. the best advice I ever got was similar to Gretzky’s advice about playing hockey, “skate where the puck’s going, not where it’s been.” the mistake that many people make when picking up a pencil and trying to draw is that they look at the end of the pencil.

one of the neat things about the kinesthetic sense is that you can put your finger where you think it ought to go without looking at your finger, you look at where you want to put it, and your finger moves there in the most efficient way possible. generally a straight line.  you do the same with the pencil. so the steps are:

  1. put pencil where you want the line to begin. 
  2. move your eyes to look at where you want the straight line to end.
  3. move the pencil point to that point. just leave it in contact with the page.

try it, you’ll be amazed how straight your lines become.

it is surprisingly tricky however. due to much practice with handwriting, people are pretty used to looking at the tip of the pencil to see what they’re writing. you don’t focus at the end of the line when you’re writing at the beginning.  it is a skill worth cultivating, so work at it.

flourless chocolate cake

  • 1 1/3 oz chocolate, semisweet or darker (tried the 99%, was a bit too dark…)
  • 2 2/3 tbsp butter
  • 1/4 cup of sugar
  • 1 egg
  • 1/6 cup of cocoa powder.

melt chocolate and butter together, (in double boiler if you like) and stir until smooth, remove from heat.

beat egg and sugar together until the mixture is significantly lighter. 4-8 minutes with electric mixer. somewhat longer if you are doing it by hand. (n.b. beating by hand will expend *just* enough calories to justify eating this…)

by this time the chocolate should have cooled somewhat, but still be pourable. needs to be cool enough not to cook the egg.

stir the chocolate/butter mixture into egg/sugar mixture. if you used a double boiler, be careful not to spill any water into the mixture.

sift the cocoa powder over the mixture and fold it in until just dampened.

pour into well buttered cake pan, ramekin, or cupcake tins. the recipe as written should make 2-3 cupcakes.

bake at 375º for 17-23 minutes (less time means more pudding like…)

recommend eating it warm, with ice cream.


(interesting variation to try would be to separate the egg white, beat until stiff and fold it in just before the cocoa powder. should probably make a decent soufflé, if anyone tries it, let me know…)

update: a little bit of orange zest is a welcome addition, also tried the beaten egg whites. didn’t rise quite to the heights I was hoping, so probably more trouble than it’s worth.

furniture value

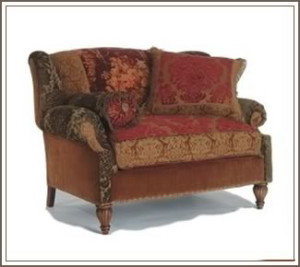
one interesting thing that I’ve learned since I started building furniture is the relative price and value of furniture pieces.  when I first looked at the settee at Domaine, the chair was $3000. I thought that was a ridiculous price for a chair.

victoria settee

the original, from the now defunct Domaine.


Then I built one. it was a pretty good copy. the problem wast that by the time I was done, the copy had cost about as much as the original. plus it had taken many hours to build. go figure.

home built settee

my copy, made from scratch

 so anyway, I am now all the way across the country to retrieve an antique chaise lounge I have inherited and shipping it home. because a comparable new piece of furniture would probably cost even more than the above chair.
 
Consider this for a moment.
 
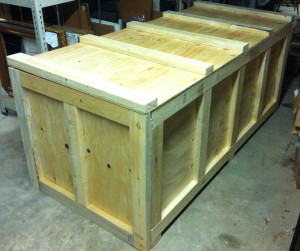
It is actually cheaper for me to fly across the country, buy the materials to build a very large crate, build it, and have it shipped professionally all the way back across the country, than it would be for me to buy that piece of  furniture new. (or even used… (it is an antique after all.)) Does it make a statement about how much we as a society value furniture… or how little we value transportation. considering the technology needed to move a person 3000 miles in just a few hours…

mystery crate
you’ll have to wait til I get home to see the new chaise…